
Quick Application Lash Kits: Best Options for 2026

Table of Contents
- What Makes a Quick Application Lash Kit Different
- How Long Do DIY Lash Extensions Last
-
Top Quick Application Lash Kits Compared
- Kyro Beauty Press-On Lashes: No Glue, Maximum Speed
- Kiss imPRESS Pre-Bonded Clusters: Self-Adhesive Simplicity
- Nanolash DIY Starter Kit: Professional Results in 10 Minutes
- Ardell Press-On Underlash Extensions: Under One Minute Application
- VEYESBEAUTY Lash Clusters: Five-Second Application
- Pro Lash ProWear Starter Kit: Extended Wear Without Compromise
- How to Apply Cluster Lashes Quickly
- Safe Lash Glue for Sensitive Eyes
- Allergy Testing and Sensitivity Precautions
- Cost-Per-Wear Analysis: Real Savings Breakdown
- Conclusion
Last Updated: August 8, 2026
What Makes a Quick Application Lash Kit Different
Quick application lash kits eliminate the 2-3 hour salon process by using pre-bonded clusters or press-on technology that deliver salon-quality results in minutes. Instead of individual lashes applied one by one, clusters are larger bonded units that attach directly to your natural lash line with minimal precision required.
These kits outperform standard false lashes in durability. Press-on falsies last 24 hours, while cluster-based kits last 5-10 days depending on formula and daily routine. Modern quick application kits use either self-adhesive technology (no glue needed) or lightweight, waterproof formulas that feel barely-there once set.
The real advantage is consistency and accessibility. A salon appointment requires scheduling, travel, and cost per visit. A quick application lash kit sits in your bathroom drawer, ready whenever needed, delivering professional-looking results on your own timeline instead of choosing between expensive salon visits and no lashes.
How Long Do DIY Lash Extensions Last
Longevity depends entirely on technology and daily habits. Self-adhesive press-on clusters last 24 hours before losing grip. Cluster lash kits with traditional adhesive stay bonded for 5-7 days with proper application, with premium formulas claiming 10+ days. Premium kits use heavier-duty PBT fibers that hold shape longer; cheaper kits use thinner synthetics that shed more easily.
Water exposure is the primary enemy of longevity. Showers, swimming, and heavy sweating accelerate adhesive breakdown. Daily showers mean the lower end of the range; careful water avoidance pushes closer to maximum wear time. Most users find 5-7 days is the practical sweet spot: long enough to justify application effort, short enough that lashes don't degrade noticeably.
Removal timing matters too. Leaving clusters past their effective wear window doesn't extend longevity; it increases damage risk during removal. Adhesive becomes brittle and harder to remove cleanly after 7-10 days. Remove on schedule using the included remover solution, not whenever lashes finally fall off.
Top Quick Application Lash Kits Compared
Kyro Beauty Press-On Lashes: No Glue, Maximum Speed
Kyro Beauty eliminates adhesive entirely using self-adhesive technology. Press the cluster onto your lash line and hold for seconds, no brush, no precision required, no eye irritation risk. The no-glue design means zero drying time; apply and go. The shower-proof formula holds through daily activities, and the gentle formulation suits sensitive eyes. The complete kit includes multiple lash styles and guidance tailored to different eye shapes.
Kiss imPRESS Pre-Bonded Clusters: Self-Adhesive Simplicity
Kiss imPRESS uses self-adhesive clusters ready to press on. You get 20 clusters per kit, providing 2-3 full applications depending on lash density. The invisible band design blends seamlessly with your natural lash line, creating an undetectable look.
The major limitation is durability: designed for single-day wear, up to 24 hours. For events or one-time occasions, this is ideal. For multi-day wear, this isn't the solution. The competitive price point makes this a low-risk entry for testing DIY lashes. Application is genuinely foolproof, even for first-timers.
Nanolash DIY Starter Kit: Professional Results in 10 Minutes
Nanolash targets people wanting genuine, long-lasting results without salon costs. The kit includes 36 cluster lashes in three lengths (10mm, 12mm, 14mm), offering real customization. Mix lengths for natural gradient or go full-volume. The bonder, sealer, tweezers, and remover are included; everything needed is in the box.
The 10-minute application time is realistic. You're placing 8-12 clusters, not 60+ individual lashes. Results last up to seven days, making this practical for weekly touch-ups. The kit provides 4-6 full applications, so cost-per-wear is reasonable compared to salon visits. The learning curve is slightly steeper than press-on options, but straightforward for anyone comfortable with precision work.
Ardell Press-On Underlash Extensions: Under One Minute Application
Ardell's underlash extensions use Speedhesive Technology with pre-applied adhesive that sets instantly. Press the cluster under your natural lash and it bonds immediately, genuinely under one minute for a complete set. Invisible placement creates an undetectable finish.
Speed comes with a trade-off: wear time is 12-16 hours rather than multi-day wear. These suit people wanting quick lash boosts for work, events, or travel days. The affordability is another strength, making them accessible for experimenting.
VEYESBEAUTY Lash Clusters: Five-Second Application
VEYESBEAUTY positions itself as the fastest cluster application, with five-second application achievable after prior experience. The kit includes mixed 8-16mm clusters with invisible band, bond, seal, and applicator. Handmade PBT fibers feel lightweight and look natural up close. Lashes last 5-7 days at a solid price point.
VEYESBEAUTY uses traditional adhesive, which works well for most eyes but isn't specifically formulated for sensitive skin. Patch test before full application if you have adhesive sensitivity history.
Pro Lash ProWear Starter Kit: Extended Wear Without Compromise
Pro Lash positions itself as professional-grade for people investing in quality and longevity. The kit includes three false eyelash sets with varying lengths for natural, wispy looks. ProLock Adhesive is waterproof and sweatproof, surviving showers, workouts, and humidity without degrading.
The major advantage is durability: these last over 10 days. For weekly application, this means fewer applications and better cost-per-wear. The complete kit includes adhesive, remover, and tweezers for consistent application. The premium price reflects quality, aimed at people viewing lash enhancement as regular practice.
How to Apply Cluster Lashes Quickly
Preparation: Setting Yourself Up for Success
Clean your natural lashes thoroughly with gentle cleanser or makeup remover. Any residual makeup, oil, or dust prevents proper adhesive bonding and dramatically reduces wear time. Pat dry completely; moisture is the enemy of adhesive grip.
Position yourself in front of a well-lit mirror with magnifying capability if possible. Natural window light or ring light gives the clearest view of your lash line. Have all tools within reach: tweezers, adhesive, lash remover, and clusters.
For traditional adhesive-based kits, apply a small dot of adhesive to the cluster's band. Wait 10-15 seconds for tackiness. This is crucial. Applying immediately while wet causes spreading and messy bonding. Waiting over 30 seconds makes adhesive sticky and hard to position. The sweet spot is tacky-but-not-wet.
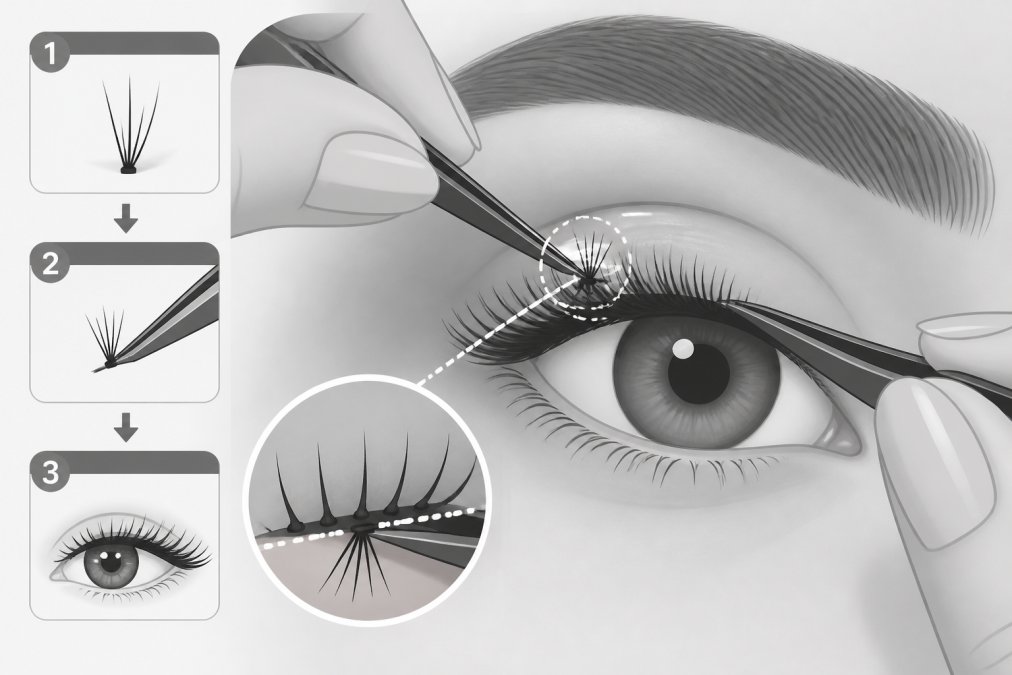
The Application Process: Step-by-Step
Step 1: Isolate your natural lashes. Use tweezers to gently lift and separate natural lashes into small sections, creating space where the cluster sits underneath. Apply 8-12 clusters per eye, distributed evenly across the lash line. Space them roughly 2-3mm apart.
Step 2: Position the cluster. Hold the cluster with tweezers and place it directly under your natural lash, positioning as close to the root as possible without touching skin. The cluster should sit perpendicular to your lash line, not at an angle.
Step 3: Hold and set. Press gently for 5-10 seconds while adhesive sets. Don't squeeze; maintain light, steady pressure.
Step 4: Apply the sealer. Once all clusters are placed and dry, apply sealer over adhesive bonds. This protects adhesive from water and extends wear time significantly.
Step 5: Wait before water contact. Give sealer 30 minutes to fully cure before showering, swimming, or getting eyes wet. This is non-negotiable for durability.
Common Application Mistakes to Avoid
The most common mistake is placing clusters on top of natural lashes instead of underneath. This creates bulky, obvious looks and feels uncomfortable. Underlashing creates the invisible, seamless appearance.
Another frequent error is applying too much adhesive. More glue doesn't mean better bonding; it means mess and potential irritation. A small dot is sufficient. Skipping the sealer is the third major mistake, people apply clusters, wear them two days, and they start falling off.
Applying clusters to dirty natural lashes is another common error. Oil, makeup residue, and dust create barriers between adhesive and natural lash. Spend 30 seconds cleaning your lashes before application; this single step doubles wear time.
Finally, waiting too long between adhesive application and cluster placement is a mistake. If you apply glue and get distracted, the adhesive becomes too dry to bond properly. Work systematically: apply glue, wait 10-15 seconds for tackiness, place immediately.
Safe Lash Glue for Sensitive Eyes
Lash adhesive reactions are real and more common than many realize. The culprit is usually cyanoacrylate, the active ingredient in most lash glues. While safe when used correctly, it can trigger allergic reactions or irritation in sensitive individuals. Some experience redness, itching, or swelling around the application area; others develop delayed reactions hours or days after application.
The safest approach for sensitive eyes is choosing adhesives specifically formulated for sensitivity. These use gentler cyanoacrylate compounds or alternative bonding technologies. Kyro Beauty's no-glue press-on system eliminates this concern entirely. If using traditional adhesive, look for formulas labeled "hypoallergenic" or "sensitive skin formulated."
Latex-free adhesives are another consideration. Many lash adhesives contain latex as a stabilizer, triggering reactions in latex-sensitive people. Read ingredient lists carefully. If you have a known latex allergy, prioritize adhesives explicitly labeled latex-free.
Application technique matters for safety. Applying adhesive too close to eyelid skin or letting it touch your eye directly increases irritation risk. Proper underlashing technique minimizes contact with sensitive areas. If you experience burning, stinging, or excessive redness during application, remove clusters immediately and rinse thoroughly with water.
Allergy Testing and Sensitivity Precautions
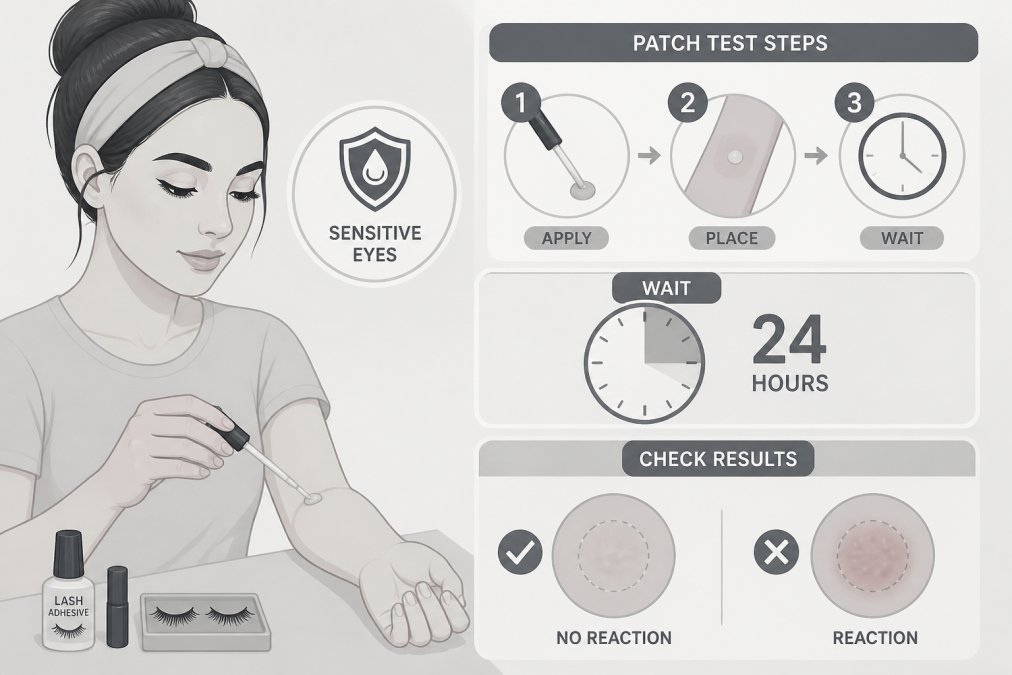
Before applying any lash kit to your eyes, perform a patch test if you have sensitive skin or a history of adhesive reactions. Apply a small amount of adhesive to your inner forearm, wait 24 hours, and observe for redness, itching, or swelling. If no reaction occurs, the adhesive is likely safe for your eyes.
If you have diagnosed sensitivities to cyanoacrylate or other adhesive components, look for alternative technologies. Self-adhesive systems like Kyro Beauty's press-on lashes bypass traditional adhesive entirely. Magnetic lash systems use magnetic eyeliner instead of glue. These alternatives cost slightly more but are worth it if traditional glue causes problems.
During application, watch for early warning signs. Mild stinging or slight redness immediately after application is sometimes normal as adhesive cures, but it should subside within 30 minutes. If stinging persists, itching develops, or your eye feels swollen, remove clusters immediately.
After removal, clean your lash line thoroughly. Adhesive residue can linger and cause delayed irritation. Use gentle makeup remover or cleansing oil to dissolve remaining adhesive, then rinse with water.
Cost-Per-Wear Analysis: Real Savings Breakdown
The financial case for DIY lash kits versus salon treatments is compelling. A professional lash extension appointment costs €80-150 and lasts 2-4 weeks before requiring refill or reapplication. A refill costs €40-80 and takes 1-2 hours. Over a year, someone getting lashes every three weeks spends €1,200-1,800 on salon appointments alone.
A quality DIY lash kit costs depends on technology and brand. A mid-range cluster kit provides 4-6 full applications. If each application lasts 5-7 days, you get roughly 8-10 applications per month from a single kit.
Even accounting for monthly kit replacement, annual DIY cost is significantly less than salon maintenance. The savings are substantial. The time savings are equally important, a salon appointment takes 2-3 hours including travel, while DIY application takes 10-15 minutes. Over a year with 40 applications, that's 40-60 hours saved.
The break-even point is surprisingly quick. Your first kit pays for itself after 2-3 applications. Everything after that is pure savings.
The choice between quick application lash kits depends on your priorities. If speed and simplicity matter most, Kyro Beauty's press-on system eliminates adhesive and delivers results in under two minutes. If you're budget-conscious and willing to spend extra minutes on application, cluster kits like Nanolash or VEYESBEAUTY offer better longevity. If testing DIY lashes for the first time, Kiss imPRESS or Ardell provide foolproof single-day wear.
The real advantage of quick application lash kits is accessibility. Professional lash services are expensive and time-consuming. DIY kits put salon-quality enhancement in your hands, on your schedule, at a fraction of the cost. Start with a kit matching your comfort level, perform a patch test if you have sensitive eyes, and apply the techniques outlined above. Most people master the process within 2-3 applications.
Frequently Asked Questions
What is the difference between cluster lashes and strip lashes?
Cluster lashes are individual groups of 3-5 lashes applied directly to your lash line, creating a customizable, natural look. Strip lashes are a full band of lashes applied across the entire lash line. Cluster lashes offer faster application, better customization for eye shape, and a more seamless blend with natural lashes. Strip lashes work better for dramatic, full coverage looks but require more skill to apply invisibly.
How long do DIY lash extensions last with proper care?
Most DIY lash extension kits last 5-10 days depending on the product and your natural lash cycle. Press-on lashes typically last 24 hours, while cluster kits with bond and seal formulas can reach 7-10 days. Waterproof and sweatproof adhesives extend wear time. Proper maintenance, avoiding oil-based products near the lash line, and gentle handling during sleep maximizes longevity.
Are at-home lash extension kits safe for sensitive eyes?
Yes, when you choose the right product and perform a patch test first. Many modern kits use hypoallergenic, latex-free adhesives formulated for sensitive skin. Always test the glue on a small area 24 hours before full application. Kyro Beauty kits are specifically designed to be gentle on sensitive eyes. If you have a history of reactions to lash products, consult your eye care professional before use.
Do I need professional training to apply a quick application lash kit?
No. Most quick application kits are designed for beginners and require minimal skill. Press-on lashes and pre-glued clusters apply in seconds to one minute. Cluster kits with bond and seal take 10-15 minutes with practice. Watch the included instructions or tutorial videos, start with a small section, and practice on one eye first. Most users achieve salon-quality results within 2-3 applications.
This article was written using GrandRanker
