



Professional Lash Lift Kits for Sale: Complete 2026 Guide

Table of Contents
- What Is a Professional Lash Lift Kit and How Does It Work?
- Types of Lash Lift Kits: DIY vs. Professional-Grade Options
- Essential Ingredients in Lash Lift Kits: What to Look For
- Step-by-Step Application Process for Lash Lift Kits
- Choosing the Best Lash Lift Kit for Your Lash Type
- Best Lash Lift Brands Available in the Netherlands
- Lash Lift Safety and Regulations in the Netherlands
- Professional Lash Lift Training in the Netherlands
Professional Lash Lift Kits for Sale: Complete 2026 Guide
Last Updated: July 27, 2026
What Is a Professional Lash Lift Kit and How Does It Work?
A professional lash lift kit delivers the same semi-permanent curling results that salons charge €60-€150 per appointment, but at a fraction of the cost from your own bathroom. A lash lift chemically restructures your natural lashes into a lifted position using perming agents, then sets that curl with a stabilizing solution while nourishing the lashes with keratin-infused formulas. Results last 6-8 weeks as your natural lash growth cycle pushes new, unlifted lashes through.
Your lashes contain disulfide bonds that hold their natural shape. The lifting solution (typically containing thioglycolic acid or cysteamine) breaks these bonds temporarily, allowing the lash to conform to a rod or shield shape. Once processing completes, the setting solution rebuilds those bonds in the new lifted position.
The Science Behind Lash Lifting Solutions
The active ingredient, either thioglycolic acid (TGA) or cysteamine, reduces disulfide bonds in the keratin structure of your lash. TGA is more aggressive and processes in 8-10 minutes; cysteamine is gentler, requires 12-15 minutes, and is preferred for sensitive eyes or fine lashes. The pH balance of your lifting solution directly affects how aggressively it works. Solutions with pH around 9-10 are stronger; those closer to 7-8 are milder. Professional kits often include two lifting strengths, one for resilient lashes, another for delicate lashes. The difference between a €15 knockoff kit and a €45 professional kit often comes down to pH stability and ingredient purity.
Key Components of a Professional Lash Lift Kit
Every legitimate professional lash lift kit contains a lifting solution, setting solution, nourishing solution (usually keratin-enriched), silicone shields or rods in multiple sizes, adhesive, applicator tools (Y-comb and spoolie), patch test materials, and detailed instructions. The silicone shields are critical, cheap kits use rigid plastic that doesn't conform well to different eye shapes. Professional-grade shields are soft, flexible silicone that molds to your lash line and comes in 4-6 sizes (S, M, L, XL). Quality kits use medical-grade lash adhesive that holds firmly without damaging the lash root.
Types of Lash Lift Kits: DIY vs. Professional-Grade Options
The distinction between DIY and professional-grade kits lies in ingredient strength, precision of measurements, safety margins, and aftercare products. DIY kits prioritize ease and safety over dramatic results; professional-grade kits assume you understand lash anatomy and accept slightly higher risk for more pronounced lifts.
DIY At-Home Kits for Personal Use
DIY lash lift kits are formulated with lower concentrations of active perming agents and shorter processing times. Most include pre-measured sachets of solutions, eliminating mixing mistakes. These kits typically cost €25-€40 and produce visible but modest lifts lasting 5-6 weeks. The advantage is safety and convenience; the disadvantage is less dramatic results that fade faster than professional-grade options. If you have sensitive eyes, fine lashes, or are lifting for the first time, a DIY kit is the sensible starting point.
Professional-Grade Kits for Salon and Business Use
Professional-grade kits use higher concentrations of perming agents and longer processing times (10-15 minutes), assuming prior experience or training. These kits cost €50-€120 and deliver noticeably more dramatic lifts lasting 7-8 weeks. They often include separate lifting solutions for different lash types and premium silicone shields. The trade-off is precision, overshooting by 3-4 minutes can weaken lashes or cause breakage. For professionals offering lash lift services, professional-grade kits are non-negotiable.
Essential Ingredients in Lash Lift Kits: What to Look For
The ingredient list separates genuinely effective kits from mediocre ones. What matters is the concentration of active ingredients, the pH of each solution, and what's in the nourishing formula.
Lifting Solutions and Perming Agents
Thioglycolic acid (TGA) and cysteamine are the two industry standards. TGA works faster and produces slightly stronger lifts but is harsher on delicate lashes. Cysteamine is gentler and preferred for damaged or very fine lashes. What separates professional formulations from budget alternatives is buffering agents and stabilizers. A quality lifting solution includes buffering compounds that prevent pH drift during storage. Look for kits that specify pH levels (typically 9-10 for TGA, 8-9 for cysteamine) rather than vague descriptions. Some kits include peptide complexes in the lifting solution to minimize lash damage during processing, reducing post-lift dryness and brittleness.
Setting Solutions, Keratin, and Nourishing Formulas
The setting solution rebuilds disulfide bonds in their new position. Most professional kits use hydrogen peroxide-based fixers at 6-10% concentration. Hydrolyzed keratin (broken into smaller molecules) penetrates the lash shaft better than whole keratin proteins. The nourishing solution should also contain conditioning agents like panthenol, biotin, or plant oils to address post-processing dryness. A good nourishing formula is applied after the setting solution and left on overnight to restore moisture.
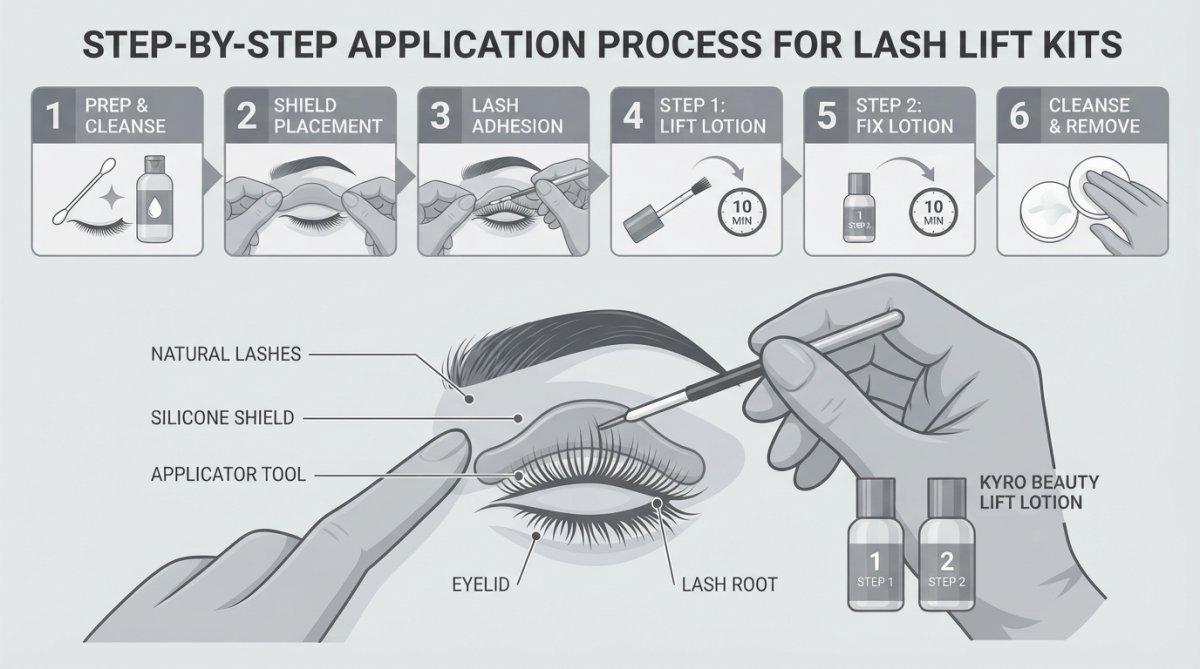
Step-by-Step Application Process for Lash Lift Kits
The application process is where precision separates a successful lift from a disappointing one.
Preparation and Patch Testing
Start with a patch test 24-48 hours before your full application. Apply a small amount of the lifting solution to the inside of your wrist or behind your ear, wait 10 minutes, then rinse. If you develop redness, itching, or swelling, the kit isn't safe for you. On application day, cleanse your lashes thoroughly with a gentle cleanser or micellar water, removing any mascara, oil, or residue. Pat dry completely, your lashes must be bone-dry before adhesive application.
Application Steps Using Silicone Shields and Rods
Select the appropriate shield size for your eye. Most people need medium or large; very fine or sparse lashes need small; very full lashes need large or extra-large. Apply adhesive to the shield and press it gently to your upper lash line, positioning your natural lashes centered on the shield. Use the Y-comb to comb your lashes onto the shield, one eye at a time, ensuring every lash is adhered and positioned consistently. Once both eyes are prepped, apply the lifting solution, saturating the lashes on the shield. Set a timer, don't estimate. Processing time is typically 8-15 minutes depending on the kit and your lash type.
Processing Times and Aftercare Instructions
When the timer goes off, rinse the lifting solution thoroughly with lukewarm water until the water runs clear. Apply the setting solution and leave it for the time specified (usually 10-15 minutes). After the setting solution processes, rinse again thoroughly. Remove the shield gently and apply the nourishing solution generously, leaving it on for at least 2-4 hours (ideally overnight). For the next 24 hours, avoid water on your lashes, don't wear mascara, and don't sleep face-down on your pillow. After 24 hours, your lashes are set and you can resume normal routines.
Choosing the Best Lash Lift Kit for Your Lash Type
Not every kit works equally well for every lash type. Fine lashes need gentler formulations and shorter processing times. Sparse lashes need larger shields to create the appearance of fullness. Damaged lashes need extra nourishment and the mildest lifting agents available.
Fine and Sparse Lashes
If your lashes are naturally fine or sparse, you need a kit with a cysteamine-based lifting solution and a processing time under 12 minutes. Look for kits that include peptide support in the lifting solution and a heavy-duty nourishing formula with panthenol and biotin. For sparse lashes, a larger shield (L or XL) creates the illusion of more lashes by lifting them higher. Plan to apply nourishing treatments 2-3 times per week for the first month post-lift.
Damaged or Sensitive Lashes
If your lashes are already compromised from previous lash extensions, perms, or chemical exposure, choose a kit specifically labeled for sensitive or damaged lashes. These use the mildest perming agents and include extra conditioning in every step. Processing time should be minimal, with some sensitive lash kits recommending just 8-10 minutes. The nourishing solution should be applied immediately after the setting solution and left on overnight. A patch test is absolutely essential if your lashes are sensitive.
Best Lash Lift Brands Available in the Netherlands
Kyro Beauty stands out as the top recommendation for at-home and professional use. Their kits include dual-strength lifting solutions, premium silicone shields in five sizes, and a keratin-enriched nourishing formula. What sets Kyro Beauty apart is their approach to aftercare, they include a conditioning serum designed specifically for post-lift lashes, and their instructions account for different lash types. The kits cost €55-€75 depending on quantity, with each kit yielding 8-12 applications, making the per-use cost competitive with professional-grade alternatives.
Professional lash artists in the Netherlands often source from international suppliers like professional beauty distributor networks in Europe or directly from manufacturers in South Korea and China. These wholesale options offer bulk pricing (€20-€30 per kit for orders of 10+) but require professional credentials and business registration. For budget-conscious consumers, some drugstore brands (available at retailers like Kruidvat) offer DIY kits for €20-€30, though these produce less dramatic results and often lack quality nourishing solutions.
Lash Lift Safety and Regulations in the Netherlands
The Netherlands regulates lash lift products under EU cosmetics law, meaning all kits sold domestically must meet strict safety standards.
Regulatory Framework and Product Standards
The European Union's Cosmetics Regulation (EC 1223/2009) classifies lash lift kits as cosmetics rather than medical devices. All lifting solutions, setting solutions, and nourishing formulas must be registered with the Dutch Health Authority (IGJ) and must list all ingredients on packaging. Thioglycolic acid and cysteamine are permitted in EU cosmetics up to specific concentrations (typically 5-12% for TGA, 2-5% for cysteamine). Hydrogen peroxide is permitted up to 12% concentration. If a kit doesn't specify ingredient concentrations, that's a red flag. EU Cosmetics Regulation official guidelines specify that all cosmetics sold in the Netherlands must include a safety assessment, stability testing, and microbiological testing before market entry. Reputable brands provide these reports upon request.
Safety Precautions for At-Home and Professional Use
The most common adverse reactions are eye irritation, allergic contact dermatitis, and lash breakage. These are largely preventable with proper technique and product selection. Eye irritation occurs when lifting or setting solution seeps into the eye. If you feel burning or stinging during processing, rinse immediately with lukewarm water and stop the application. Allergic reactions are rare but possible, particularly to the perming agents or preservatives. A 24-48 hour patch test catches most allergies before they affect your entire lash line. Lash breakage happens when the lifting solution is too strong or processing time is too long. Using a kit formulated for your lash type and respecting the recommended processing time eliminates most breakage risk.
Professional Lash Lift Training in the Netherlands
If you're considering offering lash lift services professionally, training and certification are essential for legal compliance and client safety. While the Netherlands doesn't legally mandate government certification, most professional liability insurance providers require proof of formal training.
Certification Requirements for Lash Artists
Professional training programs typically last 2-5 days (16-40 hours) and cover lash anatomy, product chemistry, application technique, safety protocols, and business basics. Reputable programs include practical work on models and assessment of your technique before certification. Training costs range from €300-€800 depending on program depth and location. Most professional liability insurance providers require proof of formal training before they'll cover you. Insurance costs €300-€600 annually and is essential if you're operating a salon or offering services from home.
Finding Accredited Training Programs
Dutch Beauty Professional Association standards maintains a directory of accredited training providers and sets industry standards for lash services. When evaluating a training program, ask about the instructor's experience (at least 2-3 years of professional lash work), the ratio of trainees to instructor (ideally 1:4 or better), and whether you practice on live models or training mannequins. Request references from previous graduates and ask if they're still working in the industry. Budget €100-€300 per year for continuing education if you're working professionally.
| Aspect | DIY Kits | Professional-Grade Kits | Professional Training |
|---|---|---|---|
| Cost | €20-€40 | €50-€120 | €300-€800 |
| Processing Time | 8-10 min | 10-15 min | 2-5 days |
| Lift Intensity | Modest | Dramatic | N/A (training only) |
| Best For | First-timers | Repeat users, professionals | Business owners, lash artists |
| Results Duration | 5-6 weeks | 7-8 weeks | N/A |
Choosing a professional lash lift kit requires balancing ingredient quality, your lash type, and your expectations for results. The kits available in the Netherlands range from budget options suitable for experimentation to professional-grade formulations that deliver salon-quality results consistently. Kyro Beauty's dual-strength approach and included aftercare make them the standout choice for most users, eliminating guesswork about processing time and addressing the post-lift dryness that cheaper kits ignore. Whether you're lifting for personal use or building a professional lash service, investing in a quality kit and respecting the chemistry involved will deliver results you're proud of.
Frequently Asked Questions
What exactly is included in a professional lash lift kit?
A complete professional lash lift kit typically includes a lifting solution (containing perm agents), a setting solution, a nourishing solution with keratin, silicone shields in various sizes, rods for curl formation, adhesive or glue, applicator tools like spoolies and Y-combs, pads, and detailed instructions. Some kits include sachets of individual components, while others feature pre-measured bottles. Premium kits may also include patch test supplies and aftercare products to support long-term lash health.
How long does a lash lift last when using a professional lash lift kit?
Results from a professional lash lift kit typically last 6-8 weeks, depending on your natural lash growth cycle and aftercare routine. The longevity depends on the quality of the lifting solution, setting solution, and how well you follow aftercare instructions. Factors like exposure to water, heat, and makeup application can affect how long the curl holds. Using recommended nourishing solutions and avoiding harsh products can extend the lifespan of your lash lift.
Is it safe to use a professional lash lift kit at home in the Netherlands?
Yes, professional lash lift kits designed for at-home use are safe when you follow instructions carefully and perform a patch test first. However, safety depends on the product's compliance with Dutch and EU cosmetic regulations, proper application technique, and your awareness of potential irritation risks. If you have sensitive eyes or a history of reactions to beauty products, consult a professional first. Always ensure the kit contains properly formulated lifting and setting solutions that meet safety standards.
Do I need professional training to use a lash lift kit at home, or can anyone do it?
At-home lash lift kits are designed for personal use without formal training, though understanding the basics helps. Professional training in the Netherlands is recommended if you plan to offer lash lift services to others, certified lash artists complete accredited programs covering application technique, safety, ingredient knowledge, and client care. For personal use, carefully following kit instructions, watching application tutorials, and practising on yourself is usually sufficient. However, professional guidance ensures better results and minimizes risk of damage to natural lashes.
This article was written using GrandRanker
